Sunday, August 30, 2009

Leaky Faucet

We've had a drip in the kitchen faucet for months now. It's one of those things that isn't a major emergency to take care of, but never lets you forget that it's a problem. Before I could work on the faucet, I needed to shut off the water, but because there was no shutoff valve on the hot water line, I had to shut off the water to the whole house. [I may end up installing shutoff valves but the will be a tale for another day]. When I finally took the thing apart I found that the control ball (this is a single lever faucet) was made of brass and had been rubbing against a steel nub for years. This eventually wore a groove into the ball that created slop in it's motion and prevented it from sitting perfectly in the 'off' position.
As it turns out, my faucet was a Delta compatible style faucet that meant that it had a standard set of replacement parts. I took the damaged control ball down to the hardware store and the plumbing people handed me this little baggie of replacement parts. Fortunately, they now make the control ball out of stainless steel.
Since I got a full set of new parts, I just went ahead and replace the whole mechanism. There are two little spring loaded rubber gaskets that sit over openings where the hot and cold water come into the faucet head that I replaced. Then the ball, and finally this nylon retainer. Another problem was that the notch in the faucet base that is used to keep the nylon retainer properly aligned had become malformed and was preventing the old retainer from seating. I reshaped the notch with a small file to allow the new retainer to sit all the way down onto the control ball.
And now I can sleep at night knowing that I'm not wasting any more water!

Wednesday, August 26, 2009

Sledge Hammer Repair

As you may recall, I recently had to bust up a big block of concrete in the back yard. To accomplish this task I was borrowing a sledge hammer from my landlord. As it turned out the handle of the sledge had a small crack in it that started to become a major crack after a few hours of pounding on concrete.I wrapped the handle up with some duct tape and it held together perfectly through the rest of the job. It seemed to be a completely functional repair, but I felt bad returning the tool in this condition so I decided to do a proper job of repairing the handle.
To start, I got a new handle from the hardware store that was supposed to the designed for the size head that I was working with. It turned out that it was not quite the right size, so I had to cut it shorter.
Now the head could seat all the way onto the top of the handle.
The next adjustment I needed to make was to the width of the handle. No amount of pounding and pushing could get this handle even half way into the hammer head so after some research, I learned that one is meant to trim the handle so it can fit inside the head. I approached this task carefully not wanting to remove too much material, so I put a sanding bit into my rotary tool and took off a little at a time. I tried putting it back into the head often to make sure I didn't take off too much wood and took note of the high points that were getting stuck so that I could contour the end of the handle to the inside of the head. I stopped when I got it to a point it didn't easily go on, but seemed that with a bit of effort it would be able to.
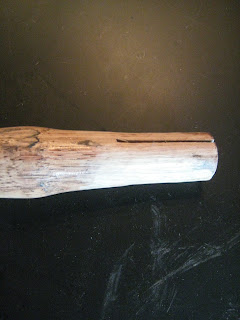
You can see here, that the wood looks a little darker than before. I used mineral oil lubricate the inside of the head and was then able to get the handle all the way through. The next step was to drive a wooden wedge into the slot in the top of the handle. The first thing I had to do was trim the wedge down to the width of the handle.
It turned out to be very difficult to pry the slot in the handle open again to get the tip of the wedge in there. I ended up pounding a razor blade into it and subsequently widening it with pry bar. Once I did get the tip of the wedge in, it was trivial to drive it all the way down. I was able to use the weight of the hammer head to my advantage here and just pounded it straight down against the floor of the garage.
Ok... we're almost there. I cut off the part of the wedge that stuck out so it was now flush with the top of the handle.
The last step is to drive in a steel hammer wedge perpendicular to the wooden wedge. At this point the wood flares out in all directions above the hammer head so I'm pretty confident that it's not going anywhere. This certainly wasn't the easiest fix

Wednesday, August 19, 2009

Milk Crate Attachment

I've been doing my groceries on the Cetma rack with a basket for about a year and a half and it has served me very well. My only complaint has been the interface between my basket and the rack. Thus far I've always used bungees. It never comes off, and it's reasonably fast to put on and take off, but I would prefer something that couldn't wiggle. When I've got 40 lbs of groceries up there and I'm trying to hold a track stand, small wiggles make a big difference.I had a number of ideas on this one but the clear material of choice ended up being 16 ga bailing wire.
I started by putting a small bail on the back of the crate to slide over the back of the rack. This will keep the crate from sliding forward once anchored at the bottom but also serves to keep it in place while I'm attaching it at the bottom.
Here you can see the wire bail that neatly fits over the back of the rack.
The attachment device needed to be extremely secure but also able to just snap on and off. For a long time I had been scheming up ways to use standard draw hasps but they would invariably require me to mount some wood to the crate and the rack. The next idea was some type of over-center buckle with a similar type of action but for webbing. I would have a strap that goes from one lip of the basket, under the rack and then back up to the other lip that could be instantly tightened with the flip of a lever. No such piece of hardware was immediately available (I found a place I could order such buckles, but there was a minimum order of 500 pieces), so I came up with a way to manufacture such a buckle. When I was at the hardware store selecting my materials to manufacture my over-center buckle, I came across this spiffy little device. It's intended use is tugging barbed wire fencing tight across the posts. For all the effort I would put into making a buckle that may not work anyways, it seemed that I would be wise to just grab this thing and call it done.
The next piece I added to the basket was a pair of small loops that hung off the bottom. The wire tightener would grab the two loops and draw the basket tight to the rack. When the loops are being used, they need to hang down, but once I take the basket off the rack, I need them to stay tucked flat against the bottom of the crate to avoid getting bent. I glued small magnets to the bottom of the milk crate to keep the wire loops out of the way when they weren't needed.
Here you're looking up at the crate sitting on the rack with the two loops being pulled tight across the bottom of the rack.
I also found a very convenient place to store the wire tug when I wasn't using it.
Here's the first load of groceries I did with the new set up. The on/off was as smooth and quick as I could ask, but while riding, the basket didn't budge, sucess!

Wednesday, August 12, 2009

Big Whiteboard for Garage

This project is one that was inspired by the availability of a material that seemed too good to pass up. It all started when I was browsing on the website of a wonderful little place called ReSource. They receive reclaimed building materials from demolition project, scraps from construction, or other donations and sell them a a great price. Everything from light fixtures and sinks to cabinets, doors, tile, fasteners, lumber and then all of the random other things that come through. At the moment I was checking their hours so I could go and pick up some lumber for a bed, but came across a posting that they had received some old chalkboards and whiteboards from a school that was being renovated. I got extremely excited about the prospect of having a chalkboard in the garage for keeping things organized and doing big thinking. I thought a little bit about where it could go, and realized that the only free wall space was the garage door itself.

The governing design principle was that a point at the top and bottom of the garage door are at their furthest when the door is open. During the course of opening and closing, those two points will get closer but never further, so as long as I mount the chalkboard in a way that can compress, it will work well. What I came up with was to mount it to the top of the door with hinges, and then tie it down to the bottom with rope so that it would be tight when the door was down but allowed to hang down a little as the door went up and down.

When I got down to ReSource, I was crushed when I discovered that they had already sold all of the chalkboards they had gotten. They did still have some whiteboards, but I really had my heart set on a chalk board. After a little stewing, I started to come around to the idea of a whiteboard. For one thing, a 4' x 8' slab of slate would weight a ton and probably be too heavy for the garage door to lift. Secondly, although the chalkboard has a certain classic aesthetic that I found very attractive, a whiteboard is really quite practical and wouldn't have the issue of chalk dust. Additionally, I could then use it to project films or something on the garage wall... cause I do that a lot.

Anyways, I got over my disappointment and decided to go with the whiteboard. They had a bunch of 12' ones, but this 8 footer seemed plenty big enough for my purposes as well as being far easier to transport. I also picked up some lumber, lag screws and the hinges for this project as well as a window for a project that you will read about in a month or so. The kicker is that I got it all $5! Not bad. After a little cleaning, it looked good as new.
I cut the 2" x 4" down to length so I could run one down each side of the whiteboard.
Here's the board mounted to the planks and leaning against the garage door.
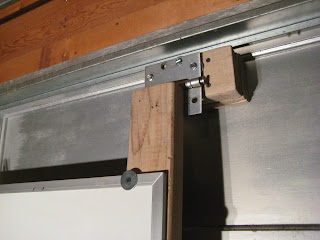
There's a few horizontal lengths of aluminum channel stock running along the garage door that would prevent the whiteboard from laying flat against it. Therefore, I had to mount the hinges on blocks to suspend the board out from the door a few inches.

Once I had the blocks on the door in the appropriate places, I mounted the hinges onto the tops of the two side planks with the heavy lag screws I had picked up at ReSource.
It ended up being pretty tricky to get the board exactly into place while I attached the hinges to the door. I had to set it up on to two folding chairs and the shim the height with some cardboard boxes. Once it was in place, I clamped and drilled my holes and then screwed it into the blocks.
The right one was a little easier, because the plank I picked up for the left side was pretty warped. But it worked just fine.
Here you can see the whiteboard in action. It runs even smoother than I had imagined.

There's the finished product! As you can see I've already started using it to plan my next project. On the right side I've attached a little bucket to hold the markers and eraser that swivels when the door goes up so they don't fall out.

Wednesday, August 5, 2009

Coat Rack

I found this over-door coat rack in a dumpster in college. And for many years it has served me well. My two gripes with it are that it makes a loud clanging noise when the door closes, and that the door doesn't close as easily with this in place. I decided it was time to move on to something that didn't have these problems.
I started with a 5' plank liberated from an old futon frame we still have part of in the garage [this frame has been giving for a long time - see bike rack post].
I planned to use large #10 nails for the hooks, so I wanted to slightly pre-drill the holes to help them go in at the desired angles and to avoid splitting the plank.
After pre-drilling the holes, it was pretty easy to drive the nails in at these goofy angles.


I finished by screwing my new coat rack to the back of my dresser.

I found that the back of my coat rack also made a convenient place to tack the end of the FM antenna from my radio [which resides atop my dresser].
And there it is in action.