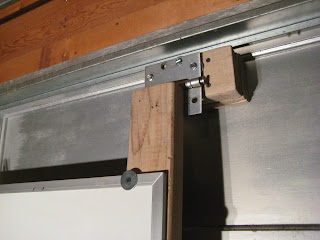
The governing design principle was that a point at the top and bottom of the garage door are at their furthest when the door is open. During the course of opening and closing, those two points will get closer but never further, so as long as I mount the chalkboard in a way that can compress, it will work well. What I came up with was to mount it to the top of the door with hinges, and then tie it down to the bottom with rope so that it would be tight when the door was down but allowed to hang down a little as the door went up and down.
When I got down to ReSource, I was crushed when I discovered that they had already sold all of the chalkboards they had gotten. They did still have some whiteboards, but I really had my heart set on a chalk board. After a little stewing, I started to come around to the idea of a whiteboard. For one thing, a 4' x 8' slab of slate would weight a ton and probably be too heavy for the garage door to lift. Secondly, although the chalkboard has a certain classic aesthetic that I found very attractive, a whiteboard is really quite practical and wouldn't have the issue of chalk dust. Additionally, I could then use it to project films or something on the garage wall... cause I do that a lot.
Anyways, I got over my disappointment and decided to go with the whiteboard. They had a bunch of 12' ones, but this 8 footer seemed plenty big enough for my purposes as well as being far easier to transport. I also picked up some lumber, lag screws and the hinges for this project as well as a window for a project that you will read about in a month or so. The kicker is that I got it all $5! Not bad. After a little cleaning, it looked good as new.
 There's a few horizontal lengths of aluminum channel stock running along the garage door that would prevent the whiteboard from laying flat against it. Therefore, I had to mount the hinges on blocks to suspend the board out from the door a few inches.
Once I had the blocks on the door in the appropriate places, I mounted the hinges onto the tops of the two side planks with the heavy lag screws I had picked up at ReSource.
 It ended up being pretty tricky to get the board exactly into place while I attached the hinges to the door. I had to set it up on to two folding chairs and the shim the height with some cardboard boxes. Once it was in place, I clamped and drilled my holes and then screwed it into the blocks.
 The right one was a little easier, because the plank I picked up for the left side was pretty warped. But it worked just fine.
 Here you can see the whiteboard in action. It runs even smoother than I had imagined.
There's the finished product! As you can see I've already started using it to plan my next project. On the right side I've attached a little bucket to hold the markers and eraser that swivels when the door goes up so they don't fall out.


was just making the rounds on my favorite blog sites, and realized i haven't checked in with the HH in a while.
ReplyDeletethe whiteboard looks really great. love the elegance of the rope solution.
That one is slick, not obvious and works way better than I would have expected.
ReplyDelete